In this tutorial, we will show you how to combine Photoshop with Filter Forge to create a glowing 3D text effect. We will begin by showing you how to create basic shapes in Photoshop, we’ll then show you how to convert them to 3D, and finally how to add the final touches using Filter Forge and a few of Photoshop’s basic features. Let’s get started!
Tutorial Assets
The following assets were used during the production of this tutorial.
Downloading Filter Forge and the Filter used
First, you need to download Filter Forge from the plugin’s website. Once you download it, run the .exe file, and that’s it! It will be added inside Photoshop under the Filter menu. Super easy to install.
To add the filter, click its link in the "Tutorial Assets" section, then click the "Open this filter in Filter Forge" button to install the filter. If you get a message asking you to confirm, just click Yes or OK. The Filter will then be added to the other filters you have.
1. Create the Text and the Basic Shape Variations
Step 1
Create a new 1280 x 1024 px document, and fill the Background with the color #a1a1a1. Then, create the text using the font Sanchez. The color is #e6e6e6, and the Size is 335 pt.
Step 2
Go to Type > Convert to Shape.
Step 3
Duplicate the shape layer, then pick the Direct Selection Tool. This will show the Shape Attributes in the Options bar. From there, set the Fill to None, and change the Stroke color to #959595 and its Size to 3 pt.
Step 4
Open the Stroke Options box, and choose Center from the Align: drop down menu.
Step 5
Duplicate the copy shape layer (the one that has the stroke), change the Stroke color to #464646, then Open the Stroke Options box again, and click the More Options button.
Step 6
Set the Align to Inside, the Caps to Round, click the Dashed Line box, and set the first Dash value to 0 and the first Gap value to 25.
This will create a simple dotted stroke, with large gaps in between. You can try different values for the Gap if you like.
2. Create the Path Inside the Text
Step 1
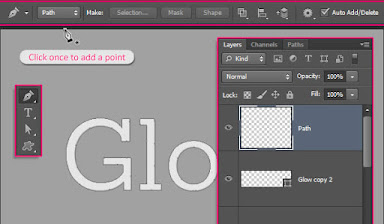
Create a new layer on top of all layers and call it Path. Pick the Pen Tool, and choose the Path option in the Options bar. We are going to create a path from one edge of the document, pass it through the text, then end it at another edge.
Click once to add anchor points.
Step 2
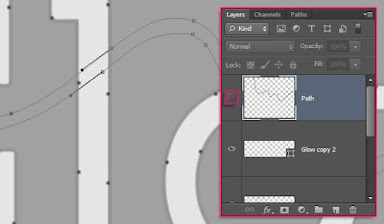
Click and drag to create curves. The path doesn’t have to look perfect, as we will modify it anyway.
Step 3
Try not to create way too many curves in and out of the text. A couple should be enough.
Step 4
Pick the Direct Selection Tool, then click the anchor points to move them around, or you can click the Direction Points at the end of the two Direction Handles, then move them around to change the orientation of the curve, or drag them outwards and inwards to make the curve wider or narrower.
Step 5
Just make sure that the curves flow smoothly without any sharp corners.
3. Stroke and Re-create the Path
Step 1
Pick the Brush Tool and open the Brush Panel (Window > Brush). Choose a hard round brush, set its Size to 10 px, and its Spacing to 1%.
Step 2
Pick the Direct Selection Tool, right click the path, and choose Stroke Path.
Step 3
Choose Brush from the Tool drop down menu, and make sure that the Simulate Pressure box is un-checked, then click OK. This will stroke the path with the 10 px brush. Hit the ENTER/RETURN key to get rid of the work path.
Step 4
CTRL/CMD + Click the Path layer’s thumbnail to create a selection.
Step 5
Open the Paths panel (Window > Paths), press and hold the ALT/OPTION key, then click the Make work path from selection icon down the Paths panel. Smaller values create more precise paths, but in this case, a very small value will create jagged edges. The value 1 works fine here. But you can go ahead and try other values if needed.
Step 6
Make the Path layer invisible by clicking the eye icon next to it.
Step 7
You might need to modify some parts of the path using the Direct Selection Tool. Also, you might get some sharp corners. To fix those, use the Convert Point Tool to click and drag those points, which will convert them to curve points instead of sharp ones.
Step 8
Now this could’ve been done using only the Pen Tool, but for beginners, or those who might find using the Pen Tool a bit difficult to create the perfect shape, this is a much easier way, and more accurate as well.
4. Convert the Shape Layers to 3D Layers
Step 1
Starting with the modified path, go to 3D > New 3D Extrusion from Selected Path.
Step 2
Repeat that for all the shape layers as well.
Step 3
To access the 3D mesh settings and properties, you’ll need to open two panels: The 3D panel, and the Properties panel (both found under the Window menu).
The 3D panel has all the components of the 3D scene, and when you click the name of any of those, you’ll be able to access its settings in the Properties panel. So make sure to always select the name of the element you want to modify in the 3D panel before you change its settings in the Properties panel.
Select the Path layer, then select the 3D mesh name tab in the 3D panel. Choose the Pillow Inflate preset from the Shape Preset Extrusion Picker.
Step 4
Click the Cap icon at the top of the Properties panel, then, under Inflate, change the Angle to 90°, and the Strength to 20.
5. Edit the Extrusion Depth Values
Step 1
Select the copy 2 layer, the Mesh name tab in the 3D panel, then change its Extrusion Depth to 50 in the Properties panel.
Step 2
Repeat the same steps for the copy layer, but change the Extrusion Depth value to 20.
Step 3
As for the original layer, set the Extrusion Depth value to 30.
Step 4
Then click the Cap icon, and under Bevel, change the Width to 20%, and choose the Cone - Inverted Contour.
6. Create the Background Layer and Merge the 3D Layers in One Scene
Step 1
Duplicate the Background layer and place the copy layer on top of all layers. Then go to 3D > New Mesh from Layer > Postcard.
Step 2
Select all the 3D layers (click the one at the top, then press and hold the SHIFT key, and click the last 3D layer down the layers panel), then go to 3D > Merge 3D Layers.
Step 3
Select the Move Tool. You’ll notice some new 3D icons in the far right side of the Options bar. Those icons are the set of 3D Modes. When you choose one of them, you can click and drag to perform changes on the selected 3D element.
So you can click and drag in any empty area of the 3D scene to change the Camera View, but don’t rotate the 3D mesh yet.
Step 4
What we are going to do next, is move the 3D meshes upwards so that the Ground Plane is not visible in the camera view you want to render.
The Ground Plane Shadows can be disabled under the Environment tab, but in case you’d like to add the text to a scene, it is better to move the 3D meshes upwards instead of disabling the Shadows.
Start by selecting all the meshes’ group names in the 3D panel, then pick the Move Tool, and use the 3D axis to make the changes.
The arrows at the ends of the axis move the mesh, the part below them is used for rotation, and the cubes are used for scaling. The cube in the center is used to scale the object uniformly. All you need to do is click and drag the wanted part.
For now, just move the meshes upwards, then select the Camera View tab to change the camera view accordingly, until the Ground Plane is not visible anymore.
7. Saving the Final Camera View
Step 1
Throughout the remaining parts of the tutorial, we will need to change the camera view a lot. But a final view must be saved so that we can see how things will look and place them accordingly.
So choose the camera view you like, then in the Properties panel, click the View drop down menu, and choose Save.
Step 2
Enter a name for the view and click OK.
Step 3
The view will be added to the drop down menu, as well as the bottom of the 3D panel. So whenever you change the view while working on the 3D objects, you can go back to the saved view by clicking its name in the 3D panel, or choosing it from the View menu in the Properties panel.
8. Placing the Meshes
Step 1
To see things more clearly, and to move the elements more smoothly, select the Scene tab in the 3D panel, then choose the Hidden Wireframes option from the Presets drop down menu in the Properties panel.
Step 2
Start positioning the elements as shown below. Make sure that the rope in the middle doesn’t intersect or overlap with the text. Change the camera view then go back to the final one to check how things look.
Step 3
When you’re done, switch back to the Default Scene Preset.
9. Applying the Materials
Step 1
Start by selecting all the materials of the original layer, then click the Diffuse texture icon and choose Remove Texture.
Step 2
After removing the texture, change the Diffuse color to #bababa, the Specular to #c1c1c1, the Illumination to #080808, and the Ambient to #000000. Then, change the Shine value to 70, the Reflection to 35, the Roughness to 5, and the Refraction to 2.
Step 3
As for the first copy materials, remove the texture, change the Diffuse color to #e4bb52, the Specular to #fff0a9, the Illumination to #1d0000, and the Ambient to #454545. Then, change the Shine value to 82, the Reflection to 24, and the Refraction to 1.76.
Step 4
Apply the same material to the second copy layer.
Step 5
For the rope materials, remove the texture as well, change the Diffuse color to #ffffff, the Specular to #c1c1c1, the Illumination to #080808, and the Ambient to #000000. Then, change the Shine value to 95, the Reflection to 15, the Opacity to 32, and the Refraction to 1.5.
Step 6
This is what you should get after all the materials are applied.
10. Background Texturing
Step 1
Select the Background material tab, then click the Diffuse texture icon and choose Edit Texture.
Step 2
This will open the original texture file. Place the Brick Texture image on top of the Background layer and in the center of the document. Don’t worry about the empty parts at the top and bottom of the image.
Step 3
Go to Image > Adjustments > Levels, then change the Gamma value to 0.70 to darken the texture a little bit.
11. Adding Text to the Background
Step 1
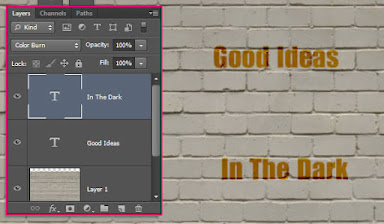
Create the text you want to add to the scene using the font UKIJ Kufi Yay. The font color is #c78c04 and the Size is 70pt. Create each line in a separate layer, then place the layers initially where you think they should be placed.
Step 2
Change the text layers’ Blend Mode to Color Burn. Then save the changes (File > Save).
Step 3
Don’t close the texture file yet, but go back to the original document to see how the text looks.
Step 4
Then, change its position in the texture file accordingly.
Step 5
It might take a couple of times to get it right.
12. Modifying the Background Text
Step 1
Click each text layer separately, the go to Layer > Rasterize Type. Then, pick the Eraser Tool.
Step 2
Open the Brush panel, then choose the Spatter 59 pixels brush tip and change the Spacing to 2.
Step 3
Under Shape Dynamics, change both the Size Jitter and the Angle Jitter values to 100%.
Step 4
On each rasterized text layer, erase some dots here and there. You will either need to click once, or click and drag very slightly, to erase those parts. Just make sure that the text remains readable.
Step 5
Save the changes and close the texture file when done (File > Close).
13. Adjusting the Lighting and Rendering the Scene
Step 1
Back to the original file, click the Infinite Light 1 tab down the 3D panel, then change its Shadow Softness value to 30% in the Properties panel.
Step 2
Click the Add new Light to Scene icon down the 3D panel, then choose New Point Light
Step 3
Change the Point Light’s color to #ff823d, its Intensity to 50%, and un-check its Shadows box.
Step 4
Place the light at the top, so that it touches the upper edge of the document. You can rotate the camera view to help you position it better.
Step 5
Repeat the same steps and settings to create another identical Point Light, and place it next to the first one. The lights should illuminate most of the text. So if you are using more letters, you might need to add another Point Light.
Step 6
Make sure that the lights look good in the final camera view.
Step 7
Go back to the Infinite Light and adjust its Coordinates if needed. Below are the values used in the tutorial (you will need to click the Coordinates icon at the top of the Properties panel).
Step 8
Once you’re done with the lighting, go to 3D > Render. This might take some time, but you can stop the rendering anytime by clicking anywhere inside the document.
When the rendering is finished, save the file, then save it as a .jpg image, and open that image to continue working.
14. Adding Light Dots to the Transparent Rope
Step 1
Set the Foreground color to #fff7e5. Pick the Brush Tool, choose a 70 px soft round brush, and in the Options bar, change the Blend Mode to Overlay.
Step 2
Click to add dots of light along the near part of the rope.
Step 3
Decrease the brush size to 60 px. then add the light dots to the rest of the rope.
(Don’t forget to change the Brush’s Blend Mode back to Normal).
15. Applying the Filter Forge Filter
Step 1
Go to Filter > Filter Forge > Filter Forge 3, then choose the 3 Way Color Correction filter under the Photo category.
Choose the preset shown below, then, under the Settings tab, change the gamma color to #FBF6E0.
Step 2
This will apply a very nice color enhancement to the final result. You can try the other presetes and play around with the values if you like. You’ll get different, but really amazing results.
Conclusion
In this tutorial, we used several of Photoshop’s tools to create glowing 3D text. We used Photoshop’s vector tools to create basic paths, Photoshop’s 3D tools to extrude those paths, and finally, we used Filter Forge to add the finishing touches.
Please feel free to leave your comments, suggestions, and outcomes below.
Facebook Page Like
YouTube Channel subscriber
Terimakasih


